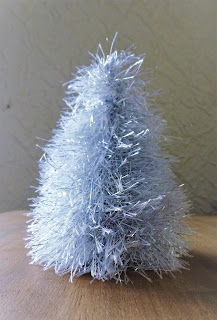
These little trees are worked in the round from the base to the tip. They have a hole in the bottom so that they can sit on corks or atop bottles. If you leave a yarn tail when finishing off, it can be used to attach a gift label, or made into a loop so that you can hang your tree on a tree. Or make a few and use them as table decorations or as part of a festive mini-forest.
I've test-knit these in both purl and knit, but think purl comes out a little 'fluffier'. If you prefer knit, just replace 'purl' with 'knit' in the instructions below.
 |
| © Dancing Moth |
Yarn: King Cole Tinsel Chunky, 10 g or less; you should be able to get at least 5 trees from a 50 g ball.
Needles: I use 4 mm dpns, but this could be adapted to circulars using magic loop (no instructions here for that yet).
Gauge: Trying to count rows (and sometimes even counting stitches) with this yarn is a nightmare, thus no gauge suggestion. My tension is quite tight, because the tighter knit will stand up by itself well.
I recommend you also use a row counter and stitch marker, either a closed marker you can slip from one needle to another or a removable marker. You may need to adjust your needle size, depending on your own tension.
Trying to tink stitches is also a problem, so this pattern needs a little concentration.
Abbreviations
sts stitches
Kfb Increase by Knitting into the Front and Back of the stitch
P Purl
P2tog Purl 2 stitches together
Cast on 15 sts, distributing 5 on each of 3 needles and join in the round without twisting.
R1-3: Work 3 rounds purl. (This will form the base with a hole in the middle for a cork or bottle-top).
R4: Kfb in all stitches to increase total to 30 sts, 10 on each needle.
R5-10: Work 6 rounds purl.
R11: *P1, P2tog, P4, P2tog, P1*, repeat on each needle (=24 sts).
R12-16: Work 5 rounds purl.
R17: *P1, P2tog, P2, P2tog, P1*, repeat on each needle (=18 sts).
R18-21: Work 4 rounds purl.
R22: *P1, P2tog, P2tog, P1*, repeat on each needle (=12 sts).
R23-25: Work 3 rounds purl.
R26: *P1 P2tog, P1*, repeat on each needle (=9 sts).
R27-28: Work 2 rounds purl.
R29: *P1, P2tog*, repeat on each needle (=6 sts).
Be careful now to keep the stitches on the needles and keep the work from twisting! Redistribute the 6 stitches over 2 needles instead of 3.
R30: Work 1 round purl.
R31: P1, P2tog, P1, P2tog, (=4 sts).
R32: P2tog, P2tog, (=2 sts, onto the same needle).
R33: Push the remaining 2 sts to the left of the needle and pulling the yarn taught, purl these 2 sts (i.e. work a single round of icord).
Cast off purlwise.
Finish off: Cut yarn, leaving just enough to work in on the inside, or leaving a 4-5"/10-12.5 cm tail. If you sew the very end of the tail into the inside of the tip or knot it well, you should be able to pull the rest of the tail down inside so that it doesn't show when you don't need it, or pull the loop up to attach a gift tag or hang your little tree.


